
Backend workflows are server-side workflows. You can use them for the majority of your work, but there are some things that they are not suitable for.
If you're working with an extensive data set or need to 'schedule' a workflow to run in the future, the standard workflows you're familiar with will not work.
In this tutorial, we'll understand how and where we can use backend workflows in Bubble.io.
Where do the backend workflows run in Bubble?
The backend workflows don't run in the browser of the user. They run server-side.
These workflows won't use up the user's computing/processing power.
Why use backend workflows in Bubble?
- If you need to 'schedule' some actions in the future, you'll need to use backend workflows. For example, charge the user after one month when the trial ends; send a reminder a week before an event.
- Another benefit is that the user doesn't have to wait for these background workflows to finish. The user can navigate to another page, start another backend workflow or do anything else. Bubble will handle these workflows in the background, so you won't notice them.
- You are iterating on a big list. With the standard workflows, you can either change a single thing or a list of things together. With backend workflows, you can work on a list one item at a time. This can be useful if you're working with a big list as you won't blow up your Bubble application's capacity.
- Your application will be well-organised as you can create a backend workflow and trigger it from various places. You only need to update the workflow once rather than multiple times.
Enabling backend workflows in Bubble
Backend workflows are available for all paid plans on Bubble. However, they need to be enabled.
Go to Settings > API > Enable Workflow API and backend workflows to enable them.

Creating a backend workflow in Bubble
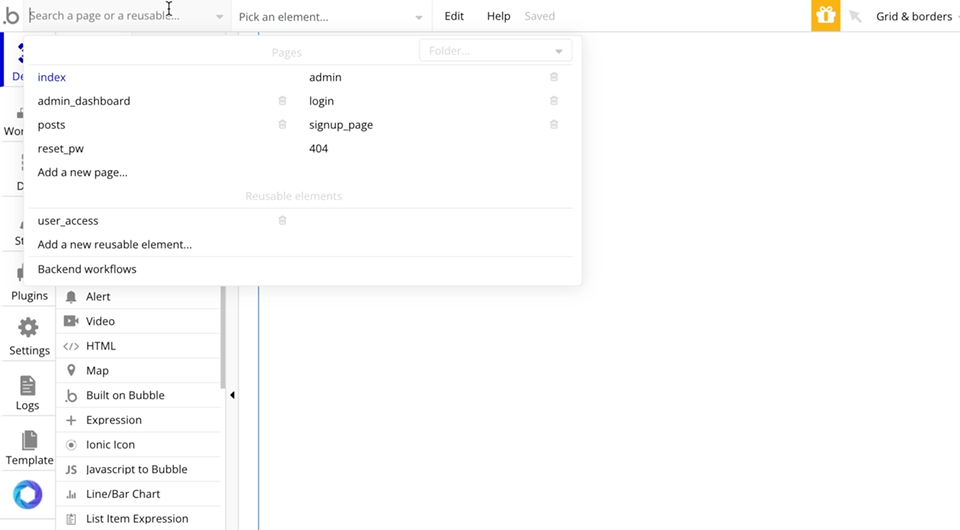
Go to the backend workflows sections in your Bubble app.
Add a new backend workflow under General > New API workflow...
Once you do that, you can now configure the workflow's settings. You can give it a name, event colour etc. Ignore the rest of the options for now, and let's begin with adding a parameter.
As these workflows run in the background, we pass the required data to the backend workflow and let Bubble run it. This information that we give is with the help of parameters.
Parameters have a 'Type of Content' and a 'Key'.
The 'Type of Content' is the type of data you're passing. Typically it is a data type, but you can also pass numbers, text etc. The Key is nothing but a name that you use to reference your value.
You can also choose whether some value you're passing is a list of things or optional.
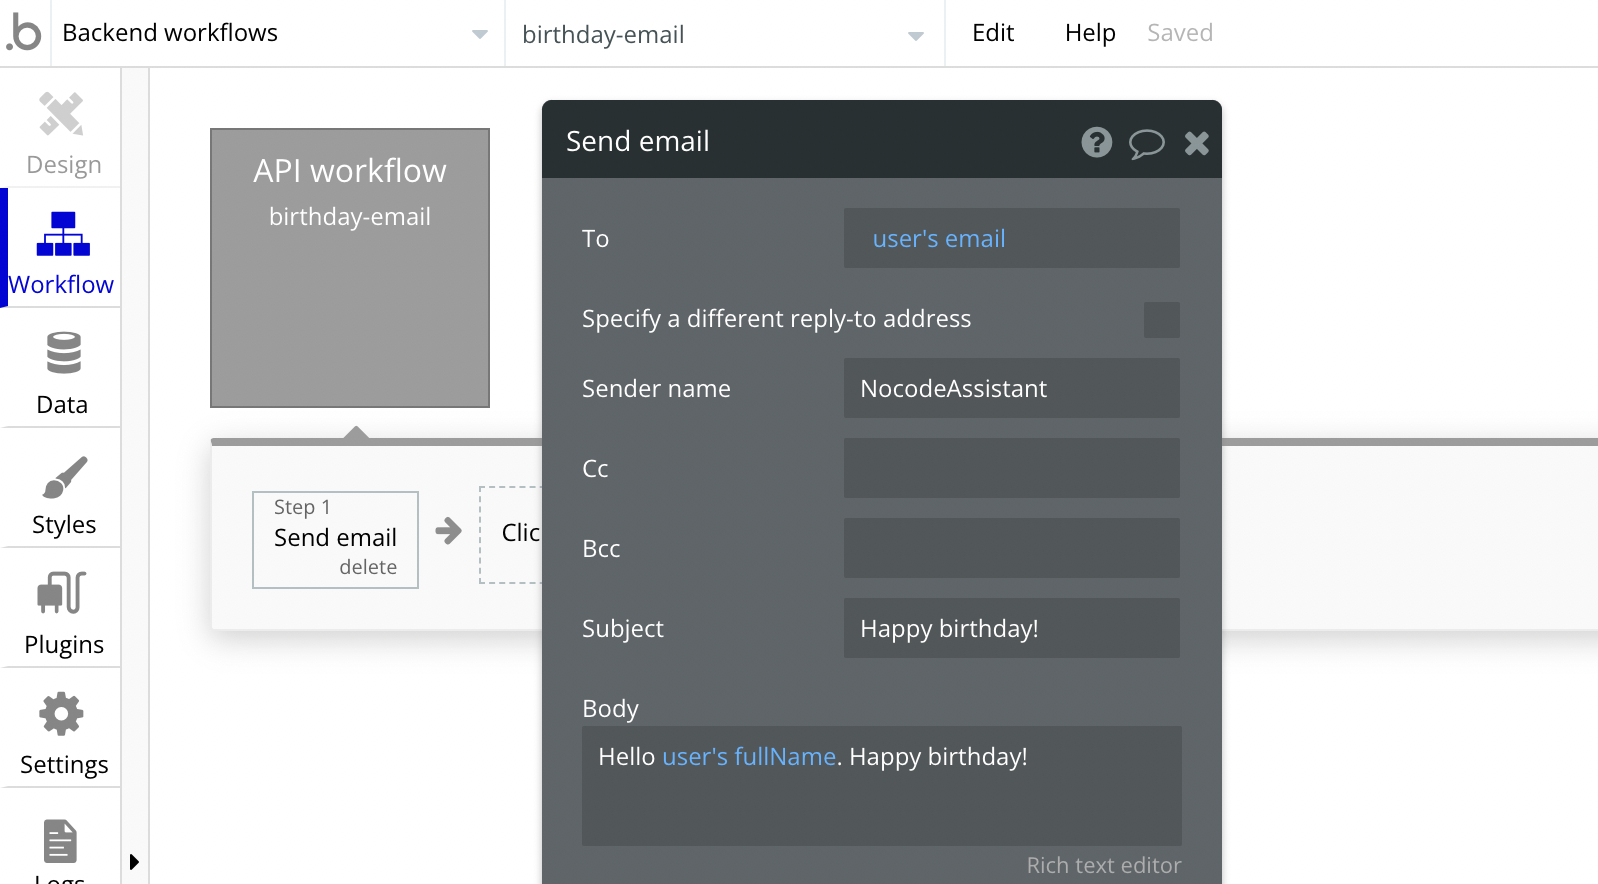
Sending birthday emails to your app users
Let's create a backend workflow to send an email to the user on their birthday.
We'll start by creating a new API workflow.After naming our workflow, we set its parameters.
We need to know the user who is supposed to get the email and the birthdate for this workflow. To keep things simple, we will send the birthday email only once. The birthdate is optional, as we can schedule it for the birthdate and then reschedule it to run again after one year.
As we need to pass the User record, the Type of user parameter will be the User data type. For the birthday, it will be a date.
We don't need to pass multiple dates or users, so we'll keep the 'is a list/array' checkbox unchecked.

We'll add a 'Send email' step in this backend workflow. We can refer to the parameters that we have defined in our actions.
For the To field, we can use the user parameter that we just defined and access all the User table fields. Furthermore, if we needed to mention the birthday in the email, we could use the birthday parameter that we created.
Triggering a backend workflow in Bubble
We can start a backend workflow from any page in our Bubble application. To start a backend workflow in Bubble, we'll find the "Schedule API workflow" action under custom events.
After selecting the desired workflow, a new set of settings will open.
We'll need to pass the parameters we defined when creating this backend workflow. Bubble will show you all the parameter values that you need to provide.
You can use any means necessary to pass this information. You can use 'Do a Search', the Result of the previous step or even give the response of an API call.
Finally, we must pass the date and time when this backend workflow should run. If you want it to run right away, you can put the Current date/time as the Scheduled date.
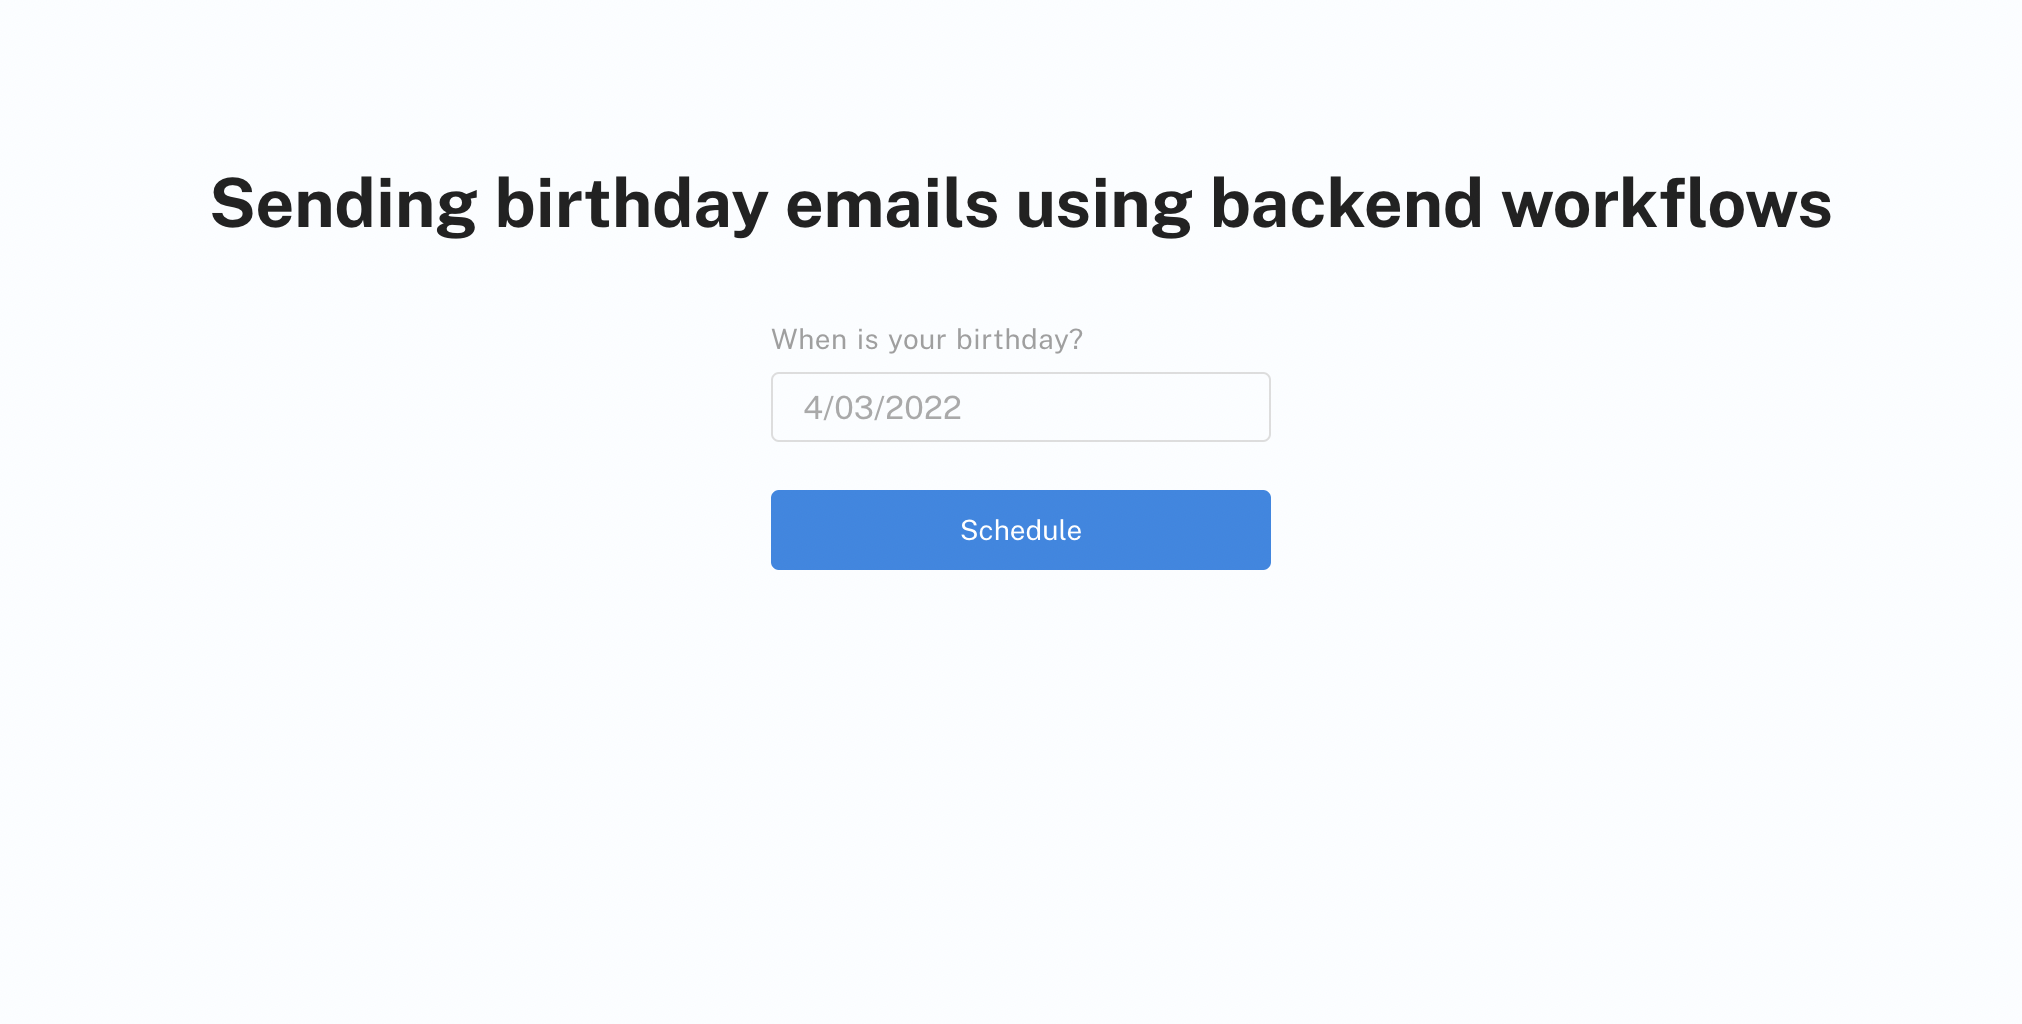
Taking our birthday example forward, let's say that you have this simple UI where you ask the user for their birthday.
Assuming you want to send this email immediately, we need to start the backend workflow. We don't need to schedule it. We can trigger the backend workflow either instantly or schedule it for a later date.
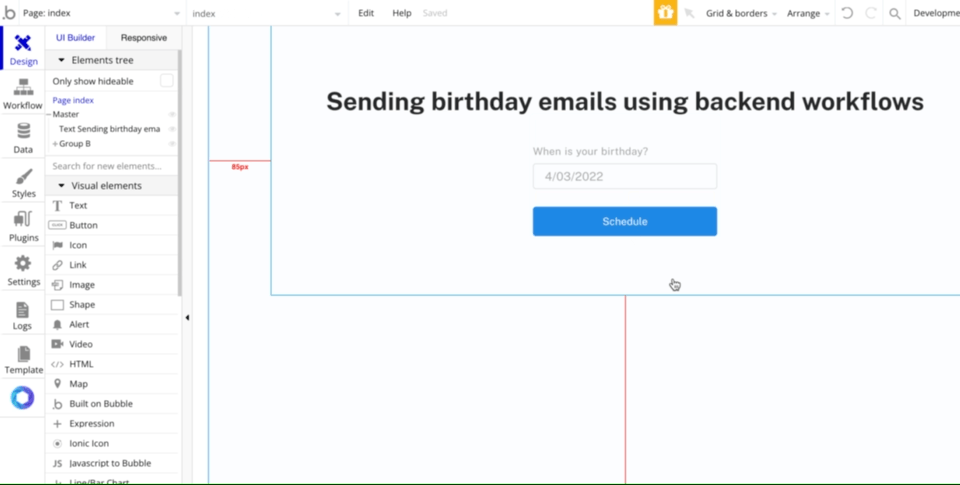
We'll add the 'Schedule API workflow' action. The Scheduled date will be the Current date/time as we want it to be sent at the earliest.
Scheduling a backend workflow for a future time in Bubble
We only need to change the Scheduled date to schedule a backend workflow for a future time.
Pick the backend workflow you want to schedule, and then choose when you want it to run.
You can also schedule multiple backend workflows together, but be sure to have some time in between them. To ensure your system is scalable, you should have a 3-5 seconds time gap between two backend workflows.
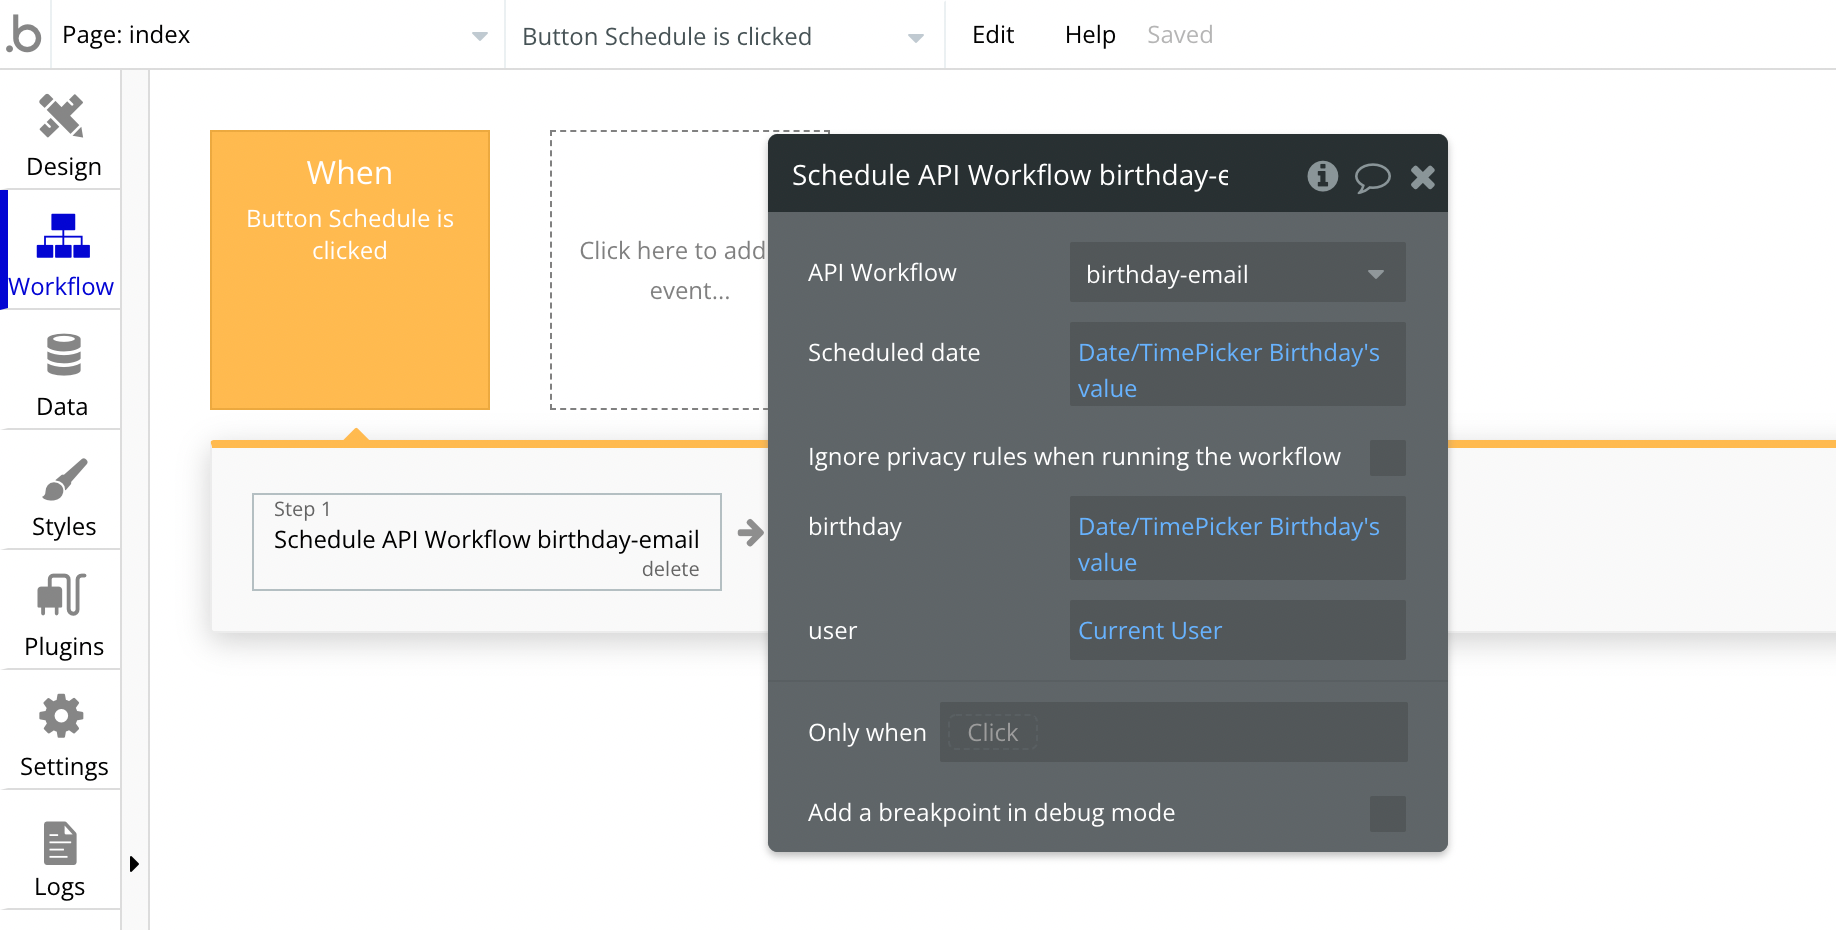
We only need to make one small change to schedule the above example for a future date.
We'll change the Scheduled date to Date/TimePicker Birthday's value. And that's it.
The backend workflow is scheduled.

Cancelling a scheduled workflow in Bubble
The 'Schedule API Workflow' action returns an ID. This ID can be used to abort a scheduled workflow.
You can cancel a future workflow execution by using the 'Cancel a scheduled API Workflow' or 'Cancel a list of scheduled API Workflows' actions. This action will require a workflow ID or a list of workflow IDs.
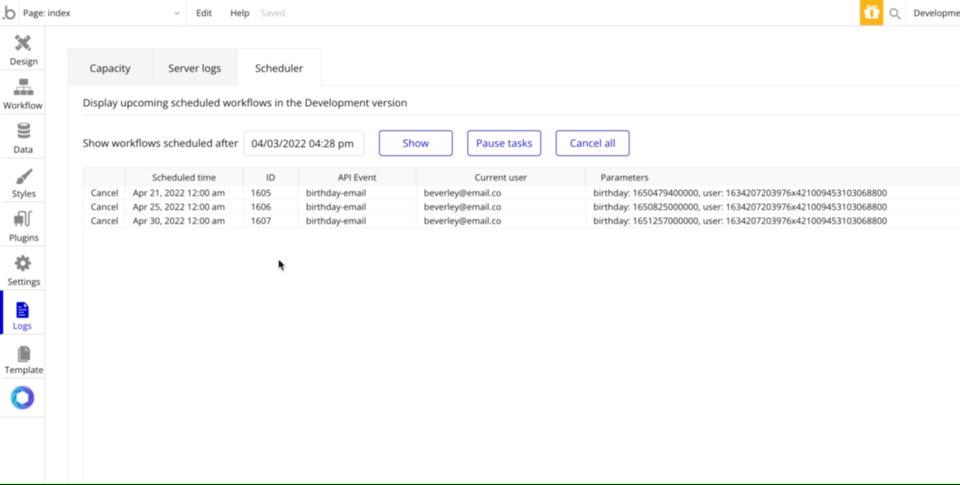
Inspecting the upcoming workflows
The Scheduler section of the Logs tab shows all the upcoming workflows.

You can cancel upcoming events by clicking on the cancel button in each row. This cancels the current row workflow.
Things to look out for
- Ensure you respect your Bubble application's privacy rules when creating a backend workflow. Check the "Ignore privacy rules when running the workflow" checkbox if you want the backend workflow to override the privacy rules.
- Ensure you give a 3-5 seconds time gap if you schedule multiple back-end workflows.

How are backend workflows different from database triggers?
- Database triggers start automatically when their trigger condition is satisfied. On the other hand, backend workflows require to be triggered using workflows.
- You can schedule a backend for a time in future. Database triggers cannot be scheduled.
- You can override the privacy settings of your Bubble application with backend workflows. Database triggers will always respect your Bubble application's privacy rules.
- You can manually cancel a backend workflow, but you cannot do the same with a database trigger.
 Himanshu Sharma
If you need some help with your Bubble app or a team of Bubble developers to build a Bubble app for you, reach out to me at [email protected]. You can also follow me on Twitter.

Join the conversation.