
Bubble is an amazing application for quickly building MVPs and getting feedback. Bubble is the perfect tool to use for an MVP.
However, if you want to generate revenue from your app, you'll need to use Stripe or PayPal in the app. Both are easy to set up and handle recurring payments by default.
This tutorial will cover how to integrate PayPal with your Bubble application. We'll create a workflow to subscribe a user to payment plans that we define in our PayPal account.
What do you need?
- PayPal Checkout plugin by Copilot
- PayPal developer account
- Data structure to store the payment details
- Workflow to trigger the checkout process
- Payment successful and error popups/pages
Setting up the PayPal button
Add the PayPal Checkout plugin by Copilot. Next, go to the editor and add the PayPal button wherever the user wants to click to start the payment. The PayPal button will be under the visual elements tab on the left.
If you have two different plans, you need two different buttons.
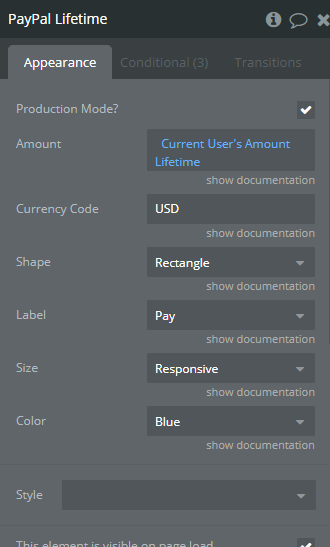
The payment buttons need to be configured as shown.

- Tick the production mode only when ready to make the changes public and have tested everything in the sandbox version.
- Enter the amount you want to be charged. If the amount is dynamic, you can use the dynamic data here.
- Currency codes can be found on the PayPal website. USD — US Dollar
- You can decide on the shape and colour according to your preferences.
Multi-currency payments
If you want to accept multiple currencies, you must make some changes. A few conditional statements will allow you to accept multiple currencies.
First, you want to give the user the option to choose the currency they wish to use. You can add a dropdown with the various currencies from which the user can select. We need to make a few changes in the conditional section of the PayPal button we just added.
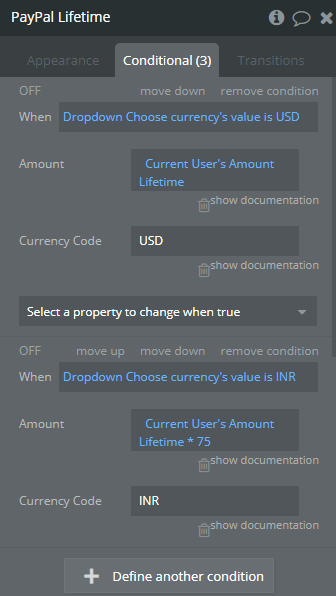
When the dropdown's option is USD, the conditional statement will change the Currency to USD, and the Amount will be based on your choice.
When the dropdown's option is INR, the button will change the Currency to INR, and the Amount will be multiplied by 75. The default amount is in USD; we must multiply it by 75 to get the INR equivalent.
Copy and paste this conditional statement to support all the currencies you want.
Creating a developer account
Head over here to register and set up your account.
Once you’ve set it up and given all the information they ask, you’ll need to create an app to get sandbox and live keys.
Create a new app here and click on the “My Apps and Credentials” section on the right.
Sandbox and Live Client IDs
Select the app that you just created and find the Sandbox Client ID. Copy this Client ID, go back to the Plugins section in the Bubble editor, and paste it under Sandbox Client ID.
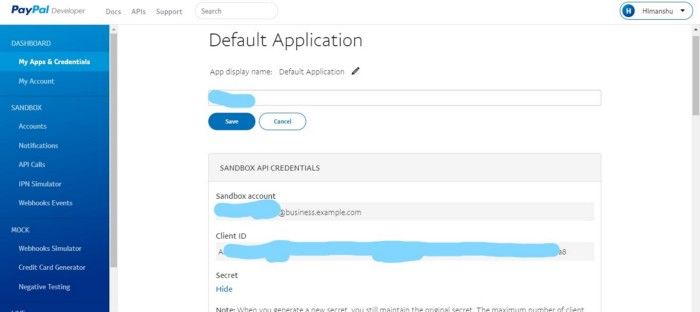
Do the same for the Live version and copy-paste the Live Client ID.
Initialising PayPal
We must first obtain the ‘Access Token’ from PayPal to start the workflows. The easiest way to execute this workflow is to run it when the page loads.
Go to the Workflow editor, right-click to add an event and then select when Page is Loaded. Then add an action and select ‘PayPal API — Get Access Token’ in the Plugin actions. You’ll need to enter your Client id:Secret key in the Authorization input area.
Whenever the user clicks on the PayPal button, a popup will appear. This will allow the user to enter the payment details and complete the transaction.
Once complete, we can decide the workflow for successful, failed and cancelled transactions depending on the transaction status.
Successful transactions
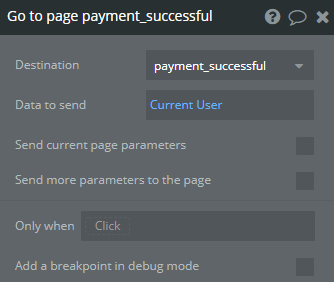
We can redirect the user to a 'Payment Success' page, show them a success alert, and update their details in the database.
Click the Workflow tab on the left and add a new event, “When a PayPal payment has been collected”. Select the button and then start the process.
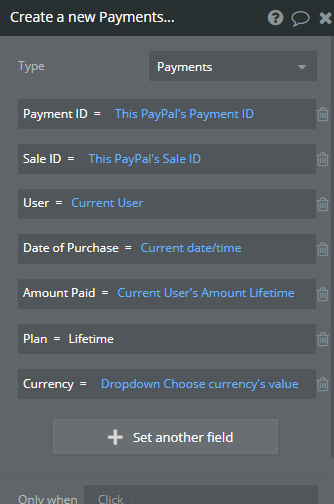
The Payments data type has the following fields. We can store the appropriate information in our database for future reference. You can decide to store more information if desired.
Ideally, we'd store somewhere in our app whether a user should have access to the paid features. And a best practice is to store it at "Team" level instead of the user level. However, for simplicity, we can also store it at the user level.
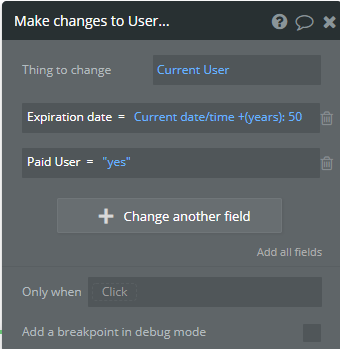
After this, the user is navigated to the Payment Successful page. You can navigate them to the homepage, send an email or whatever you like.
Failed/Cancelled transactions
Like successful transactions, you can also set up workflows for failed/cancelled transactions.
Add another event, “When PayPal payment has been cancelled/failed”, and set up the workflow accordingly. I chose to show a popup asking the user to try again.
Testing the workflows
Try processing a few transactions using the test card details and see if they appear in your PayPal dashboard. After you have tested everything and it is working, you can push the changes live. Make sure to uncheck the Production mode.
If you need some help with your Bubble app or a team of Bubble developers to build a Bubble app for you, reach out to me at [email protected]. You can also follow me on Twitter.


Join the conversation.